Panasci Zoom Meeting Setup
- Michael Cameron
Sign in and configure your account at https://syracuseuniversity.zoom.us/

Suggested Settings
In your Zoom web portal, click settings on the left-hand side of the navigation menu, scroll through settings. Some settings may be set by default.
Meeting Settings
Security Settings
- Enable Waiting Room
- Enable Require a passcode when scheduling new meetings
- Enable Require a passcode for Personal Meeting ID (PMI) - Select All meetings using PMI
- Disable Only authenticated users can join meetings
- Disable Only authenticated users can join meetings from Web client
Schedule Settings
- Enable Host Video and Participants Video
- Enable Mute all participants when they join a meeting
In Meeting Settings
Disable Sound notification when someone joins or leaves
- Enable Co-host
- Enable - Screen sharing - Who can share - All.
Email Notification
- Enable When an alternative host is set or removed from a meeting. When enabled, the Alternative Host will receive an email upon the scheduling of a meeting.
Recording Settings
- Enable Cloud recording
Schedule a Meeting from the Zoom web portal
Select Meetings in the navigation menu on the left. Click Schedule a Meeting (on the right-hand side).


Fill out the following sections
Topic: Enter a topic or name for your meeting.
Description: Enter an optional meeting description.
When: Select a date and time for your meeting.
Duration: Choose the approximate duration of the meeting.
Time Zone: By default, Zoom will use the time zone set in your profile. Click the drop-down menu to select the Eastern Time Zone.
![]()
Meeting ID: By default, Generate Automatically selected: This will generate a random unique meeting ID.
Security: Select Passcode - Zoom will auto generate a numeric password.
Select Waiting Room - Only users admitted by the host can join the meeting.
Video: Select Host & Participant selected
- Host: Choose if you would like the host's video on or off when joining the meeting. Even if you choose off, the host will have the option to start their video.
- Participants: Choose if you would like the participants' videos on or off when joining the meeting. Even if you choose off, the participants will have the option to start their video.
Audio: By default, Both selected
Meeting options: Only select the following meeting options
- Mute participants on entry: Participants can unmute themselves after joining the meeting.
- Automatically record meeting: Select in the cloud.
- Alternative Hosts - Enter the email of the selected Alternative Host. The host can designate another user with a syr.edu account to be the alternative host. The alternative host can start the meeting on the host's behalf. This user will receive an email notifying them that they've been added as an alternative host, with a link to start the meeting.
Press SAVE
Sending Invites
Calendar
Once finished, you can select a calendar option to import the scheduled meeting to your calendar.
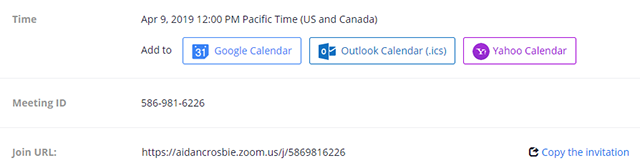
Invite Link
You can also manually copy the meeting information by clicking Copy Invitation. You can copy the invitation and send it out through email.
![]()

How do I start or join a scheduled meeting as the host?
- Sign in to the Zoom web portal - https://syracuseuniversity.zoom.us/
- Select Meetings
- Under Upcoming Meetings, click Start next to the meeting you want to start.

- The Zoom client will launch automatically to start the meeting.
How do I start a scheduled meeting as the alternative host?
- The alternative host can start the meeting on the host's behalf. This user will receive an email notifying them that they've been added as an alternative host, with a link to start the meeting.
Here is an example of the email the selected alternative host will receive. From here, the user will be able to start the meeting.

Here are a few steps to perform when you have started your meeting.
- Open Participants window: In this window, you will also have the ability to manage your participants. You will have the ability to mute participant's audio and video. You will also have the ability to assign a participant to be a Co-host.
- Open Security window - Enable Allow participants to Share screen. This will allow participants the ability to share their screen.

Using Waiting Room
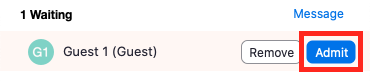
Admitting participants during a meeting
- As the meeting host, click Manage Participants.
- Click Admit to have the participant join the meeting.
Admit all participants from the Waiting Room
- As the meeting host, click Participants.
- Click Admit all.

Sending participants to the Waiting Room during a meeting
- As the meeting host, click Participants.
- Click More next to the participant's name and choose Put in Waiting Room.

Sending messages to participants in the Waiting Room
- As the meeting host, click Chat.
- Click the dropdown next to To:

- Click Everyone (in Waiting Room). Type and send your chat message to the Waiting Room.

- Once the message has been sent, the participants in the Waiting Room will see the message on the Waiting Room screen:
