Enable Camera/Mic on Windows - (Teams, Zoom, Collaborate)
- Former user (Deleted)
- Thuc Phung
- Matthew Mistur (Deactivated)
- Kelvin Nyamalor
To ensure your camera is on and working properly prior to recording/streaming your class, event, meeting, etc. follow this guide.
We will highlight different applications and how to enable the camera within them. This document will also cover useful tips to preview the camera and adjust its zoom/positioning prior to recording.
Navigate this page
Power on / Test the Camera in Windows
If you want to test your camera or verify it is on and working prior to recording, you can navigate to 'Camera' app in Windows.
- Search 'Camera' in the bottom left from your Windows Desktop
- If camera is on and working - a window will open allowing you to view how your camera appears
- You can adjust the view from the Camera Controls of the Extron Panel located on the Teaching Station
Enabling Camera / Microphone in a Browser
If you are streaming from Chrome, Firefox, etc. in a web browser, you may encounter an issue where your Camera/Microphone is blocked by the browser. You must 'Allow' these from your settings if this occurs.
Google Chrome
- Go to a site that wants to use your microphone and camera.
- When prompted to use Camera/Mic, a small window will appear asking you to choose Allow or Block.
- Allowed sites: Sites can start to record when you're on the site. If you're using a different Chrome tab or a different app, a site can't start recording.
- Blocked sites: Some sites won't work if you block them. For example, you won't be able to join a video conference|

- Select 'Allow' and the camera/mic will work within that tab (i.e. Teams, Collaborate, Zoom, etc.)
Alternatively, if the window does not appear asking for Allow, or you previously 'Blocked' camera. You may change the settings within your browser to enable:
- At the top right, click More
Settings.
- Under "Privacy and security," click Site settings.
- Click Camera or Microphone.
- Turn Ask before accessing on or off.
- To remove an existing exception or permission, to the right of the site, click Delete
.
After you complete the steps and reload the page, the new settings will apply to the site.
Firefox
A prompt will appear when your browser is trying to access Camera/Mic.
- Open Firefox and go to the desired recording site.
- A confirmation pop-up displays asking if you want to share your device’s camera and microphone with that site. Your device’s default camera and microphone is selected from the designated drop-downs.

- Select a different camera and/or microphone if necessary.
- Select the checkbox if you want Firefox to remember your selections for this site so that they can be used by default in the future.
- Click the button to begin using your camera/mic within the browser tab.
Alternatively, if the window does not appear asking for Allow, or you previously 'Blocked' camera/mic. You may change the settings quickly from the address bar:
- Click the
 icon that displays in the address bar on the left.
- Any relevant permission statuses for the current site are displayed in the Permissions section of the drop-down panel.

- Any relevant permission statuses for the current site are displayed in the Permissions section of the drop-down panel.
- Click the X next to Allowed , Allowed Temporarily, Blocked or Blocked Temporarily to clear the status so that Firefox will ask again for permission when you next visit the site.
- Reload the page and be sure to select 'Allow' when prompted in the browser.
After you complete the steps, the new settings will apply to the site.
Microsoft Edge
If you want to modify previously configured permissions for a particular website, use these steps:
- Navigate to the website you want to manage.
- Click the Lock icon next to the website link in the address bar.
Use the drop-down menus to change the permissions.
Choose 'Allow' for Camera and Microphone.

- Click the Refresh button on the site to apply the changes.
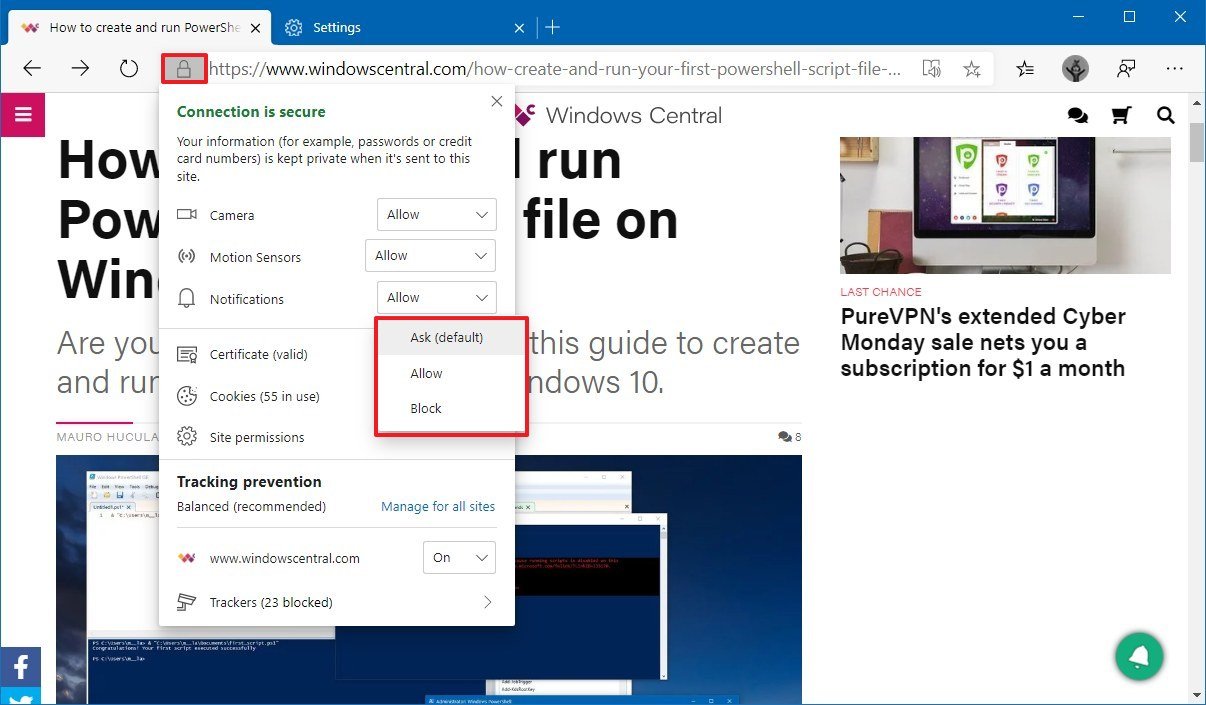
After you complete the steps, the new settings will apply to the site.
Enabling / Controls for Camera + Microphone in Common Meeting Apps
Microsoft Teams
Settings / Test your video & audio before a meeting
- Click your profile picture (default picture is a circle with your initials) at the top of Teams, then Settings > Devices.
- Under Audio devices, pick the speaker and mic you want Teams to use by default.
- Under Camera, select the camera you want Teams to use, and see a preview of that camera's video.
Adjusting your video / audio settings while in a meeting
- Select 'More Actions' on the meeting toolbar.
.png?version=1&modificationDate=1596470196000&cacheVersion=1&api=v2&width=350&height=139)
- Select 'Show device Settings'
.png?version=1&modificationDate=1596470333000&cacheVersion=1&api=v2&width=400&height=247)
- On the right a window will open with Audio device settings. Here you can customize your output speaker and your input microphone.
- Options to select Camera are also available
Zoom
Settings / Test your video & audio before a meeting
- Log in to the Zoom client.
- Click your profile picture then click Settings.
- Click the Video tab.

- You will see a preview of your camera and can choose a different camera if needed.
For audio:
- From Settings, select 'Audio'

- Follow the selections to test your speakers and/or microphone
- Select Echo Cancelling Speakerphone for Microphone
- Select EXTRON D Display Audio for Speaker


5. To use Logitech Headset select it in the respective Microphone/Speaker options
Adjusting your video / audio settings while in a meeting
For Video:
- Click the arrow next to Start Video / Stop Video. (For Audio, Select 'Join Audio')

- Select Video Settings or Audio Settings to configure
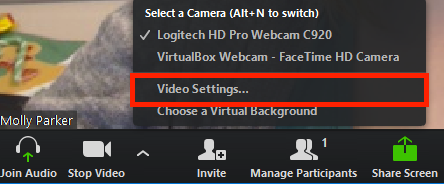
Zoom will display your camera's video and settings. - If you don't see your camera's video, click the drop-down menu and select another camera.
Blackboard Collaborate
Audio and Video Setup
When you first join a Collaborate session you will be prompted to set up your audio and video.

- If you do not set up your audio and video when prompted, you can set up audio and video at any time in My Settings. To access your My Settings area, open the Collaborate Panel on the lower right side of the screen.

- Click the My Settings button at the bottom of the page.
- This will open your My Settings. Click Select Set Up your Camera and Microphone to set up your audio and video.

- Audio will play over your computer's speakers or your headphones. As a best practice, we recommend using headphones for audio, as this will help to reduce background noise and echoes.
- When prompted, choose the microphone you want to use. Select Yes - it's working to proceed.
- Choose the camera you want to use. Collaborate tells you that you look great when it is receiving your video. Select Yes, it's working to proceed.
By default, your audio and video feeds are hidden and muted after you complete the setup. Select the microphone and camera icons to begin full meeting participation. Alternatively, with your keyboard, press Alt + M to turn your microphone on and off. Press Alt + C to turn your camera on and off.

Adjusting your video / audio settings while in a meeting
- After joining a meeting you should see this screen. Select the purple button in the bottom left to expand the window.

- From the new window, select the settings gear on the far (bottom) right.
.png?version=1&modificationDate=1596472008000&cacheVersion=1&api=v2&width=450&height=347)
- Adjust your settings for camera, speaker, and microphone here. (Select Set up your camera and microphone to restart the setup process that prompts when you join a meeting).
Instructional Videos
Microsoft Teams
Zoom
Blackboard Collaborate
Other Resources
- Technology resources for Faculty and Staff
- Technology Resources for Students and Instructors
- Policies and procedures
- Tech resources for Faculty and Staff